
Interior wall patching and painting Thornhill isn’t just about covering up holes and choosing a paint colour. When damage shows up on your walls—especially ceiling stains or soft spots—there’s usually a root cause that needs fixing first. A fresh coat of paint over water damage or mold won’t solve the problem; it’ll just hide it until the damage spreads further into your drywall and framing.
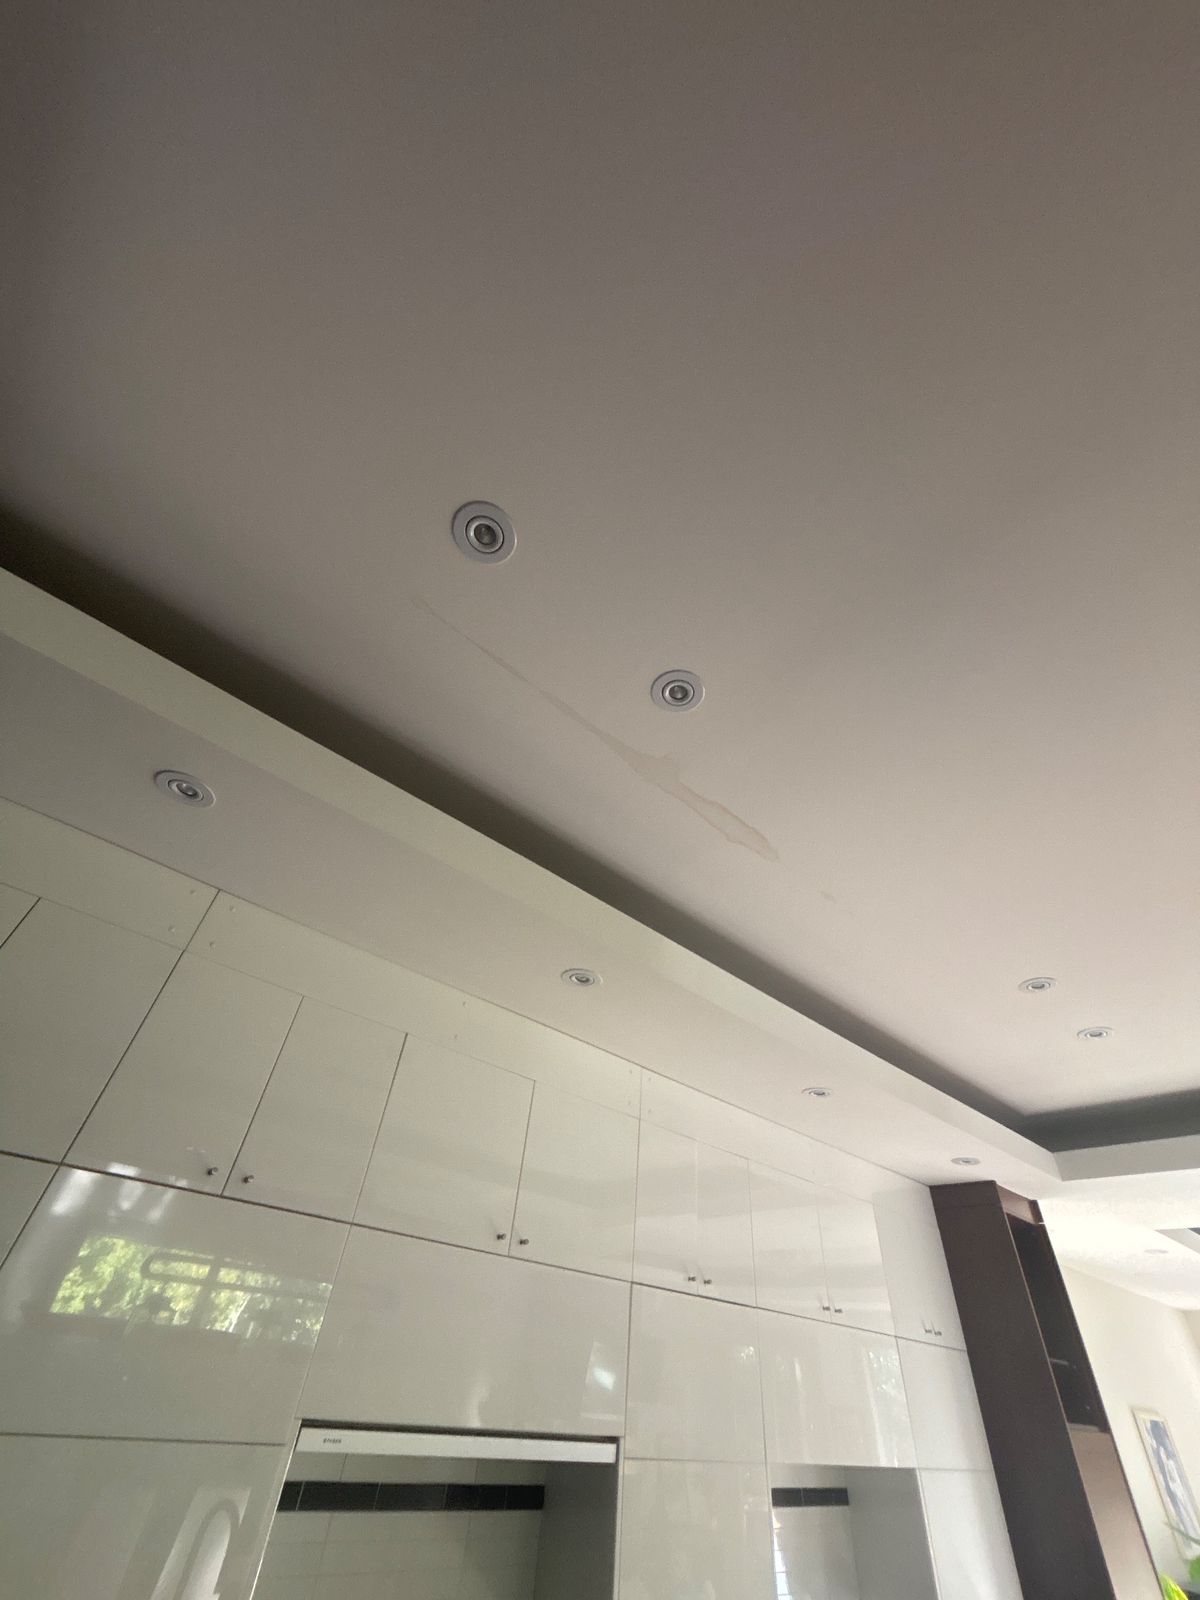
That’s why professional interior wall patching starts with diagnosis. One of our recent Thornhill projects involved a homeowner who noticed a discoloured patch on their ceiling. We cut into the ceiling to inspect what was actually happening—and found an active water leak that would have caused serious structural damage within months. Catching these issues before they become expensive fixes is the difference between a $500 repair and a $5,000 one.
Whether you’re dealing with water stains, impact damage, or settlement cracks, the right approach depends on what’s actually wrong. Let’s walk through what a real professional interior wall patching and painting job looks like.
Why Wall Damage in Thornhill Homes Is Often More Than Skin Deep
Wall and ceiling damage in Thornhill homes frequently points to underlying issues that paint alone can’t fix. Water leaks from roofs, HVAC condensation, or plumbing are common culprits—especially in older homes across Thornhill and North York. When moisture gets into drywall, it weakens the material and creates an environment for mold, which poses health risks and spreads quickly if left untreated.
Soft spots, bubbling paint, or discoloured patches are all red flags. The damage you see on the surface is often just the visible part of a larger problem hiding behind the wall. That’s why cutting into a ceiling or wall to inspect the damage—before you ever grab a paintbrush—is a critical first step that many DIY attempts skip.
Thornhill’s climate adds to the challenge. Winter freeze-thaw cycles and spring moisture can push water into wall cavities through micro-cracks in exterior walls. Interior moisture also builds up from cooking, showers, and laundry, especially in bathrooms and kitchens. Without proper ventilation and moisture control, even new drywall will develop stains and soft spots within a season or two.
Addressing the leak, water source, or ventilation problem before patching and painting ensures your repair stays solid. This is why a professional inspection—sometimes involving a strategic cut to see inside—saves money and prevents callbacks.
What Interior Wall Patching and Painting in Thornhill Actually Involves
A complete interior wall patching and painting job in Thornhill follows a structured process that separates amateur work from professional results. Here’s what you’re paying for when you hire an experienced team.
Step 1: Inspect and Diagnose
The first step is a thorough inspection of the damaged area. In the Thornhill project we mentioned, this meant carefully cutting into the ceiling to locate the water source. Our technicians assessed moisture levels, checked for mold, and traced the leak back to its origin. This diagnostic stage is non-negotiable—you can’t patch properly until you know what caused the damage and whether the source has been stopped.
Step 2: Prepare the Surface
Once the underlying issue is addressed (leak repaired, ventilation improved, mold treated), preparation begins. This involves:
- Removing loose paint, peeling wallpaper, or damaged drywall material
- Cleaning and drying the area completely
- Sanding rough edges to create a smooth foundation
- Using primer or sealant if mold or stains are present
Proper prep work takes time—often 4 to 8 hours depending on damage size—but it’s what prevents the patch from cracking or bubbling within months.
Step 3: Patch the Damage
Patching method depends on damage type and size. Small nail holes or dents use spackle or joint compound applied in thin coats. Larger holes (more than 6 inches) need drywall repair, which involves cutting out damaged sections, installing new drywall patches, mudding the seams, and sanding smooth. This is where precision matters—poor mudding work shows through paint and looks unprofessional.
Step 4: Prime and Paint
After patching has dried and been sanded smooth, primer is applied to seal the patch and ensure uniform paint coverage. Interior painting follows with two coats of quality paint to match your existing walls or freshen the whole room. Professional painters in Thornhill, Vaughan, and Richmond Hill know that cheap paint looks flat and fades faster—high-quality paint from Benjamin Moore or Sherwin-Williams protects the repair and looks better longer.
| Damage Type | Repair Method | Time to Complete | Typical Cost (CAD) |
|---|---|---|---|
| Small holes (nail, screw) | Spackle and sand | 2–4 hours | $150–$300 |
| Medium damage (6–12 inches) | Drywall patch with mudding | 8–16 hours (including dry time) | $400–$800 |
| Large damage (12+ inches) or water damage | Drywall replacement + inspection | 16–32 hours | $800–$2,000 |
| Full room repaint after repair | Primer + 2 coats paint | 8–16 hours | $600–$1,500 |
At RenoHeal, our experienced technicians handle each step with attention to detail. We’re fully insured and provide a warranty on eligible repairs, so your patched and painted walls stay looking professional. If you’re in Thornhill, Toronto, Scarborough, or anywhere across the GTA, get a free estimate to see what your specific repair will cost.

How Pros Diagnose the Root Cause Before Touching a Paintbrush
A stained or damaged interior wall isn’t always what it looks like on the surface. Before any patching or painting in Thornhill, a professional handyman cuts into the ceiling or wall to see what’s actually causing the damage—usually water intrusion or a hidden leak. This diagnostic step takes 30–60 minutes but saves you thousands in repeated repairs.
When we inspect a damaged patch, we look for:
- Active moisture or wet insulation (sign of an active leak above)
- Mold or discoloration on studs and drywall backing
- Damaged roof membrane, flashing, or gutter leaks that need fixing first
- Condensation issues from poor ventilation or humidity
If moisture is present, repainting over it doesn’t work—the damage returns within months. RenoHeal’s technicians identify the leak source (roof penetration, ice damming, plumbing, HVAC duct condensation) and recommend fixes before patching. In Thornhill’s climate, winter ice dams and spring thaws cause roughly 40% of interior ceiling stains; proper gutter maintenance and insulation checks often prevent costly repairs.
Once the root cause is fixed, drywall repairs and interior painting can proceed without risk of failure.
2026 Cost Guide: Interior Wall Patching and Painting in Thornhill
Prices for drywall repair and painting vary by damage size, wall condition, and whether the leak source needs fixing. Below is a realistic breakdown for Thornhill and surrounding GTA areas (Toronto, North York, Vaughan, Markham).
| Repair Scope | Drywall Patch Size | Labour + Materials | Timeline |
|---|---|---|---|
| Small wall patch (scuff, small hole) | Under 12 inches | $150–$280 | 1–2 hours |
| Medium patch (water stain, impact damage) | 12–24 inches | $280–$550 | 2–3 hours |
| Large ceiling or wall patch | 2–4 sq ft | $550–$1,100 | 3–5 hours |
| Full wall re-drywall (studs visible, mold) | 4+ sq ft | $1,100–$2,500+ | Full day |
| Leak diagnosis & inspection (cut-in) | Diagnostic only | $200–$350 | 0.5–1 hour |
| Interior paint (after patch, single wall) | Per 100 sq ft | $250–$400 | 2–4 hours |
| Entire room paint (drywall included) | 300–400 sq ft | $900–$1,600 | Full day |
What’s Included in These Costs
- Labour: Experienced technician, site prep, trim protection, cleanup
- Materials: Joint compound, drywall tape, primer, high-quality interior paint (Benjamin Moore or Sherwin-Williams)
- Sanding & finishing: Smooth finish coat ready for paint
Extra Costs to Expect
If the inspection finds an active leak or water damage beyond the visible patch, budget for:
- Roof leak repair or gutter work: $500–$2,000+
- Mold remediation: $300–$1,500 (depends on extent; severe cases need a specialist)
- Insulation replacement: $150–$400 per section
- Ductwork or plumbing repair: varies by source
RenoHeal provides free estimates that identify these hidden costs upfront. In 2026, Thornhill homeowners typically spend $600–$1,400 on a standard patch-and-paint job when no leak repair is needed, and $1,500–$3,500 when the water source must be addressed first. Our 7+ years of experience and full insurance coverage ($5M) mean we catch problems early and stand behind every repair.
DIY vs. Hiring a Professional for Wall Patching and Painting
Wall patching looks simple until you’re standing in front of a hole that’s bigger than you thought. The main risk of DIY is compounding the problem—if you patch over active moisture or structural issues, you’ll end up paying more down the road. A professional inspector will cut into the ceiling or wall to find out what’s causing the damage before applying a single patch.
The skill gap is real. Blending a patch so it’s invisible requires practice with joint compound, sanding technique, and primer-to-paint ratios. You need the right tools: a drywall saw, taping knives in multiple widths, a sanding block, and a shop vac to control dust. Most homeowners rent or buy these once and never use them again.
When patching is worth hiring out: holes larger than 6 inches, water damage, cracks that keep returning, or jobs involving more than two rooms. When it might make sense to DIY: small nail holes, minor scuffs on existing paint, and you’re comfortable with a 4-6 hour learning curve. For Thornhill homes with older plaster or active moisture issues, a professional inspection costs under $200 and saves thousands in rework.
RenoHeal’s interior painting team begins every job by diagnosing the root cause—whether it’s settling, moisture, or impact damage. This step alone prevents recurring repairs.
Common Mistakes Homeowners Make When Patching Walls
Skipping primer is the #1 costly mistake. Joint compound is porous and absorbs paint differently than drywall, leaving a dull spot that screams “patch job” under side lighting. Even if you patch with matching paint, primer locks in the compound and creates a uniform surface. Two coats of primer or primer-in-one, then two finish coats, is standard.
Using the wrong joint compound for your situation causes early cracking. All-purpose compound works for small holes but shrinks as it dries. For holes over 2 inches, use setting-type compound (90-minute or 45-minute varieties) which shrinks less. In Thornhill’s variable humidity, using the wrong compound can leave gaps that crack within weeks.
Painting over active moisture is a fast-track to mold. If the wall is wet, damp, or you haven’t identified the leak source, paint traps moisture inside the wall. This is especially common after roof leaks or plumbing issues. A professional will locate and address the moisture source before any patch work begins.
Sanding too aggressively breaks through the first layer of compound and creates an uneven surface. Light, even passes with 120-grit sandpaper are enough. Heavy sanding also releases fine drywall dust into your home’s HVAC system.
RenoHeal’s drywall repair process includes moisture testing and identification of root causes before any patch work starts—this prevents the costly mistakes that show up months later.
Frequently Asked Questions
How much does it cost to patch and paint a wall in Thornhill in 2026?
For most Thornhill homeowners, a single patch-and-paint job runs between $150 and $450 CAD depending on hole size, texture complexity, and whether the wall needs a full prime coat. Larger water-damaged sections or textured drywall repairs can push costs to $600–$900 when multiple coats and feathering are required. Getting a free on-site estimate is the most reliable way to pin down your specific number.
Can a water-damaged wall be patched and painted without fixing the leak first?
No — patching over an active or unresolved leak is money thrown away. The moisture will bleed through fresh paint within weeks, cause the compound to bubble, and often trigger mold growth behind the wall. The leak source must be confirmed resolved and the drywall allowed to dry completely (typically 48–72 hours minimum) before any patching compound goes on.
How long does interior wall patching and painting take to complete?
A standard small-to-medium patch — think a fist-sized hole or a stress crack — is typically completed in one day, including drying time between coats. Larger sections, skim-coat repairs, or walls requiring two finish coats may take two visits spread over two days to allow proper cure time. Rushing dry time is the single most common reason patches crack or look uneven after the fact.
Will the patched area match my existing wall colour and texture?
With a skilled technician and the correct paint — ideally the original can or a colour-matched mix — colour matching is very achievable on flat or eggshell finishes. Texture matching is the trickier part: knockdown, orange peel, and skip trowel all require hands-on technique to blend properly. On older walls where the existing paint has faded, blending the patch into the full wall section (rather than spot-painting) gives the most consistent result.
Do I need to repaint the entire wall or just the repaired section?
For walls painted within the last two to three years with a known paint colour, spot repainting the repaired section often blends well enough that a full wall repaint isn’t necessary. On walls with faded paint, high-sheen finishes, or where the original colour is unknown, painting the entire wall from corner to corner is the cleaner and more lasting solution. Your technician can assess the existing sheen and fade on-site and give you an honest recommendation.
How do I know if my wall damage is from a plumbing leak or a roof issue?
Location is your first clue: damage on an exterior wall near the roofline or directly under a flat section of roof points to water intrusion from outside, while staining near plumbing fixtures, under bathrooms, or along pipe runs usually indicates a plumbing source. Roof-related damage often appears or worsens after heavy rain, whereas plumbing leaks can show up any time regardless of weather. If you’re unsure, a handyman or inspector can trace the stain pattern and help you identify the source before any repair work begins.
Interior Wall Patching and Painting in Thornhill: The Bottom Line
A proper wall repair isn’t just about covering a hole — it’s about matching texture, priming correctly, and blending paint so the finished wall looks like nothing ever happened. Cut corners on any of those steps and the patch shows up within a season, usually at the worst possible time.
Thornhill homeowners should budget $150 to $900 CAD depending on damage size and wall complexity, always confirm the source of any moisture damage before patching begins, and be honest with themselves about whether a spot repaint will truly blend or whether the full wall needs a fresh coat. Getting the prep right is what separates a repair that lasts from one that needs to be redone.
RenoHeal’s technicians handle everything from hairline cracks to large water-damaged sections — fully insured, WSIB-covered, and backed by a 4.9-star rating across 3,500+ completed projects. Request a free quote today and find out exactly what your repair will cost, or learn more about our full interior painting services to see what else we can do while we’re there.