
If your closet is a pile of folded chaos or a single rod that’s done nothing useful in years, closet shelving installation in Toronto is one of the fastest ways to turn that wasted space into something that actually works. Whether you’re in a downtown condo, a Scarborough semi, or a Vaughan townhouse, the right shelving system transforms even the smallest reach-in closet into organized, functional storage.
Most homeowners underestimate how much the installation itself matters. Shelves that aren’t anchored into studs — or properly secured with drywall anchors when studs aren’t in the right spot — will sag, pull out of the wall, or fail under real load. Getting it right the first time saves you a patched wall and a second installation bill.
This guide covers what a real closet shelving job looks like from start to finish, what different systems cost in Toronto, how a professional approaches the work, and what to ask before you hire anyone. Everything here is based on actual hands-on experience completing these installs across the GTA.
What a Real Closet Shelving Job Looks Like (From a Toronto Condo)
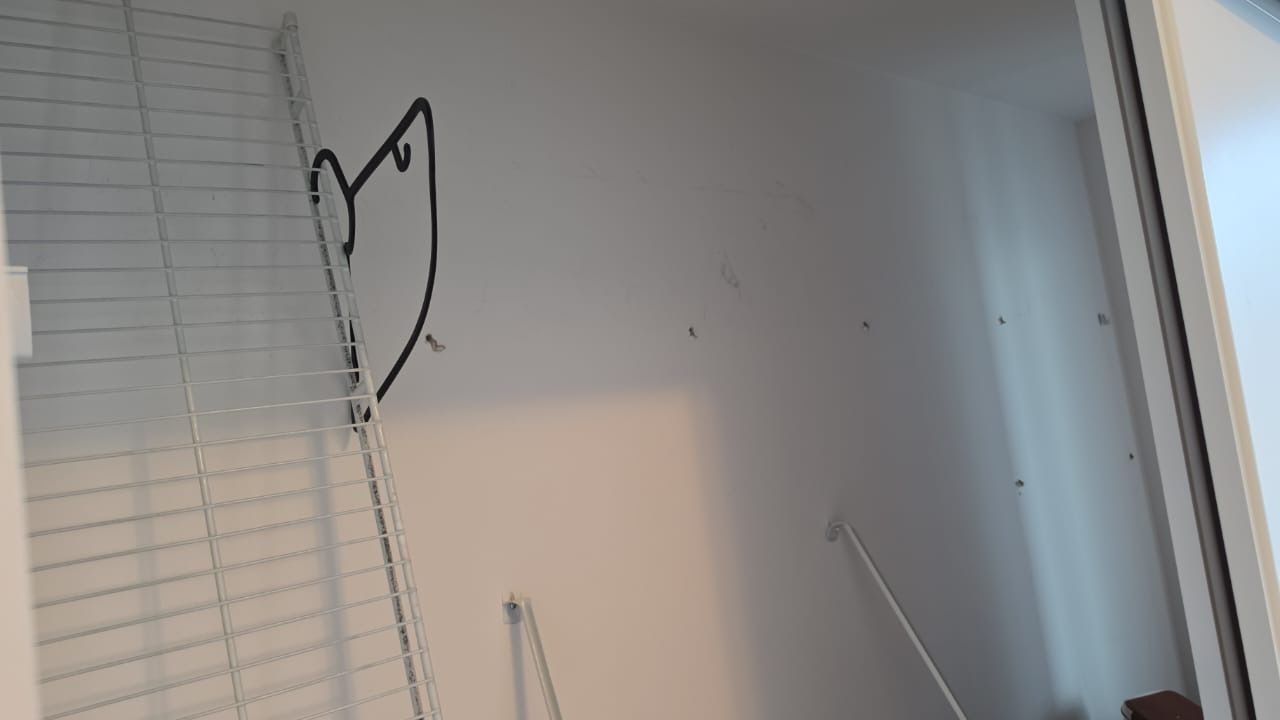
Unit 2310 in a Toronto condo building is a good example of a typical closet shelving job — compact space, standard drywall construction, and a client who wanted more than a single hanging rod. The scope included installing wire shelving with steel support brackets, drywall anchors where studs weren’t available, and a support pole to carry the hanging load.
Here’s how the install actually unfolded:
- Measure and mark the layout. Before a single bracket went up, the technician measured the closet width, confirmed usable depth, and marked level lines on the wall for each shelf run. In a condo, walls aren’t always perfectly square — you check, you don’t assume.
- Locate studs and plan anchor points. With drywall construction throughout most Toronto condos, studs don’t always line up where you need them. Where studs were present, brackets were screwed directly in. Where they weren’t, heavy-duty drywall anchors were used to distribute the load safely.
- Install steel support brackets. Each bracket was set at the correct height, levelled, and fastened securely before the shelving went on. This is the step most DIY installs rush — and it’s where failures start.
- Mount the wire shelving. The wire shelving sections were cut to length, clipped into the brackets, and checked for level along the full run. Wire shelving is popular in Toronto condos for good reason: it’s light, it doesn’t trap dust, and it handles everyday closet loads without issue.
- Set the support pole. A vertical support pole was installed underneath the shelving to prevent mid-span sag — critical when the shelf run is long or when heavier items like folded sweaters or bins will sit on top.
The whole job in unit 2310 was completed the same day. The client went from a bare rod to a fully organized closet with upper shelving, a hanging section, and stable support throughout. For more on what our handyman services cover across Toronto and the GTA, including closet work like this, the full list is on our services page.
Closet Shelving Options: Which System Works Best for Your Space
Not every closet needs the same solution. The right shelving depends on what you’re storing, how much wall space you have, and whether you’re in a condo unit, a Scarborough semi-detached, or a Vaughan townhouse with a walk-in. Here’s how the main options break down.
Wire Shelving
Wire shelving is the most common choice for standard bedroom and linen closets — it’s affordable, allows airflow (good for clothes and linens), and installs quickly with steel brackets and a support pole. This is exactly the system used in the RenoHeal project at unit 2310 in Toronto. It handles everyday loads well and costs significantly less than wood alternatives.
Melamine Shelving
Melamine boards give a cleaner, furniture-like look and are popular in bedroom closets where appearance matters. They’re heavier than wire, so proper drywall anchors and bracket placement are critical — especially in older Toronto condos where stud spacing isn’t always predictable.
Solid Wood or Plywood
Wood plank shelving is the most durable option and holds the most weight. It suits garage storage, pantries, and custom built-ins. The trade-off is cost — both materials and installation time go up considerably.
Modular Systems
Pre-designed modular systems from manufacturers like ClosetMaid combine multiple components — shelves, drawers, rods — into one configurable unit. They look sharp but require precise measuring and more installation time. Our handyman services cover all of these systems from start to finish.
| System | Best For | Avg. Cost (Materials) | Durability |
|---|---|---|---|
| Wire | Standard closets, condos | $30–$80 | Good |
| Melamine | Bedroom closets | $60–$150 | Very Good |
| Solid Wood / Plywood | Pantries, garages, custom | $100–$300+ | Excellent |
| Modular | Walk-ins, master closets | $150–$500+ | Very Good |
How Closet Shelving Installation in Toronto Pros Actually Do It
There’s a big difference between slapping up a shelf and installing one that actually holds. Here’s exactly how the RenoHeal crew approached the shelving job at Unit 2310 in Toronto — the same process used across hundreds of closet projects in North York, Scarborough, and Etobicoke.
Step 1: Find the Studs and Plan the Layout
The first thing a pro does is run a stud finder across every wall inside the closet. Hitting a stud means a mechanical fastener goes directly into wood — far stronger than any anchor alone. In older Toronto condos and houses, studs aren’t always where you expect, so this step never gets skipped.
Step 2: Mark Shelf Heights and Check for Level
Shelf heights get marked with a pencil and a long level — not eyeballed. A line that’s even 3mm off over 1.8 metres will look noticeably crooked once the shelf is loaded. Pros mark both ends, snap a chalk line, and double-check before drilling a single hole.
Step 3: Install Wall Brackets and Drywall Anchors
Where studs aren’t available, heavy-duty drywall anchors are used — the toggle or snap-toggle type rated for the expected load, not the cheap plastic kind that pull out under weight. Steel support brackets go in at every anchor and stud point, typically spaced no more than 600mm (24 inches) apart.
Step 4: Mount the Wire Shelving
Wire shelving panels clip into the wall brackets and get secured with wire shelving brackets at the front lip. This stops the shelf from tipping forward when weight is applied — a step DIYers commonly miss.
Step 5: Set and Secure the Support Pole
The support pole sits between the shelf above and a bracket below, adding vertical stability so the shelf doesn’t sag under the weight of clothing. On this Toronto project, the pole was cut to exact length on-site and locked into position before the final level check. The whole installation was confirmed plumb, level, and load-ready before the crew packed up.
Need the same done right the first time? explore our handyman services or get a free estimate for your closet project.
Closet Shelving Installation Cost in Toronto (2025 Price Guide)
Most Toronto homeowners spend between $150 and $600 CAD for a standard closet shelving installation, depending on the size of the space, materials chosen, and whether you’re in a condo or a house. Condos like the unit we worked on at 2310 often have concrete or drywall-over-concrete walls, which adds a bit of time and requires the right anchors — that factors into the final price.
Here’s a realistic breakdown of what you can expect to pay in 2025:
| Cost Item | Typical Range (CAD) | Notes |
|---|---|---|
| Wire shelving (per linear foot) | $3 – $8 | Standard ventilated wire, widely available |
| Steel support brackets | $15 – $40 per set | Quantity depends on shelf spans |
| Drywall anchors & hardware | $10 – $25 | Concrete anchors cost more in condo units |
| Support pole (vertical) | $20 – $50 | Adds mid-span support for longer runs |
| Labour – basic single closet | $100 – $200 | 1–2 hours for a standard reach-in |
| Labour – walk-in or complex layout | $200 – $400 | Multiple walls, custom cuts, condo walls |
| Total – condo unit (typical) | $200 – $450 | Includes materials and labour |
| Total – house (typical) | $150 – $350 | Standard drywall walls, easier anchoring |
These ranges reflect real project costs across Toronto, North York, and Scarborough. Prices shift based on how many shelves you need, whether the closet has been drywalled properly, and how much prep work the walls require before anything goes up.
Want an exact number for your space? Get a free estimate and we’ll assess your closet before committing to anything.
DIY vs. Hiring a Professional: What Toronto Homeowners Should Know
Closet shelving looks straightforward until you’re standing in a condo unit at 11pm with a stripped anchor, a sagging shelf, and a YouTube tutorial that doesn’t match your wall. In Toronto and across the GTA, most closet walls are drywall over steel stud — not wood — which changes everything about how you anchor shelving safely.
Standard plastic drywall anchors won’t cut it for loaded wire shelving. You need toggle bolts, snap toggles, or ideally you hit a stud. A single wire shelf bracket holding 50–80 lbs of winter gear will pull right out of a drywall anchor that wasn’t rated for the job. That’s a real repair bill on top of a failed install.
Condo buildings add another layer. Many Toronto high-rises — including buildings in North York, Etobicoke, and downtown — have rules about wall penetrations, noise during work hours, and contractor access. Unit 2310-style installs (high-floor condos) often require a building work permit or elevator booking just to bring materials up.
The honest time comparison looks like this:
- DIY: 3–6 hours including trips to Home Depot, measuring, patching mistakes, and a second attempt at level
- Professional install: 1–2 hours, materials on hand, done right the first time
If your closet walls are drywall, your building has noise restrictions, or you’re not confident finding studs behind plaster, a professional is the faster and cheaper option once you factor in your time and the cost of fixing errors. Our handyman services cover exactly this kind of job — same day, no guesswork.
Common Mistakes That Lead to Sagging or Falling Shelves
Most shelf failures come down to a handful of preventable errors. After completing thousands of installs across Toronto and the GTA, our technicians see the same problems repeatedly — and they almost always trace back to the original installation.
The Most Common Installation Errors
- Using the wrong drywall anchors: Plastic expansion anchors are not rated for heavy shelf loads. In a closet taking coats, shoes, or boxes, they pull out. Toggle bolts or screw-in anchors rated for the actual load weight are the right choice.
- Skipping stud location: Drywall alone cannot hold bracket screws under real weight. At least one bracket per shelf run should hit a stud — especially for the support pole carrying hanging clothes.
- Bracket spacing too wide: Wire shelving brackets spaced beyond 24 inches allow the shelf to flex and eventually bow. Heavier loads need brackets every 16 inches.
- Overloading after install: A standard wire shelf system handles roughly 50–80 lbs per linear foot. Stacking heavy items like tool boxes or luggage beyond that rating stresses every anchor point.
Getting the anchor selection and bracket layout right from the start is exactly what separates a shelf that lasts years from one that comes down at 2 a.m. If you’re unsure about your wall type or load requirements, contact us before you start drilling.
Frequently Asked Questions
How long does closet shelving installation take in a Toronto condo?
A single reach-in closet typically takes 2–4 hours from start to finish, including wall prep, levelling, anchoring, and cleanup. A larger walk-in with multiple shelf runs, a hanging rod, and a shoe rack section can run 5–8 hours. Condos with concrete or masonry walls take longer because a hammer drill and masonry anchors are required — that alone can add an hour or more depending on how many anchor points are needed.
What type of wall anchors should be used for closet shelving on drywall?
Whenever possible, drive screws directly into wall studs — that’s the strongest and most reliable attachment point for shelving. When studs don’t line up with your bracket positions, use toggle bolts (also called butterfly anchors) rated for the load you’re hanging. Plastic expansion anchors are not suitable for closet shelving because the weight and vibration of daily use will cause them to pull out over time. For heavy-duty shelving systems, a ledger board screwed across multiple studs distributes the load far better than individual anchors.
How much weight can wire closet shelving hold with standard brackets?
Most standard wire shelving brackets are rated for 35–50 lbs per linear foot when properly anchored into studs. A 6-foot shelf section anchored correctly can therefore hold roughly 200–300 lbs of evenly distributed weight. That rating drops significantly if you’re relying on drywall anchors instead of studs, and overloading one area — like piling heavy winter coats at one end — accelerates sag. Always check the manufacturer’s load rating for the specific product you’re installing, and add a mid-span support bracket on any shelf run longer than 36 inches.
Do I need permission from my condo board to install closet shelving?
In most Toronto condos, interior closet shelving that doesn’t affect the unit’s structure or mechanical systems falls under routine improvements you can make without board approval. That said, every condo corporation has its own declaration and rules, so it’s worth a quick review of your status certificate or a short email to property management before you start. Some buildings also require that any work be performed by an insured contractor — which is another reason to have your installer carry liability coverage and WSIB. When in doubt, get written confirmation from your property manager so you’re protected.
How far apart should shelf brackets be spaced to prevent sagging?
For wire shelving, brackets should be placed no more than 24 inches apart to prevent noticeable deflection under normal loads. With solid wood or MDF shelves, spacing depends on the material thickness — 3/4-inch plywood or MDF should have support every 24–32 inches, while thinner shelves need support every 16–20 inches. Heavier items like shoes, books, or folded denim call for closer spacing regardless of material. As a general rule, if you’re unsure, err on the side of one more bracket — they’re inexpensive insurance against a collapsed shelf.
Is wire shelving or wood shelving better for a bedroom closet?
Wire shelving is the more practical choice for most bedroom closets: it’s lighter, allows airflow (which reduces musty odours and moisture buildup — important in Toronto’s humid summers), and costs less. The main drawback is that small items can tip through the gaps and the surface isn’t ideal for folded clothing without a liner. Wood shelving — typically melamine-coated MDF or prefinished plywood — looks cleaner, holds folded clothes and accessories better, and gives you a more finished look if your closet is open or has glass doors. If budget allows, many homeowners combine both: wire for hanging sections and shoe storage, wood for folded-clothing cubbies and shelves.
Get Your Closet Shelving Installation in Toronto Done Right the First Time
The difference between shelving that sags, pulls away from the wall, or wastes half the available space — and shelving that actually works — almost always comes down to proper planning, correct anchoring, and level installation. Whether you’re working with a compact condo reach-in or a full walk-in closet, the fundamentals don’t change: hit the studs, space your brackets correctly, and choose materials that match how the space gets used.
Doing it yourself is possible, but mistakes are common — especially in older Toronto homes where walls are uneven, studs are inconsistent, or concrete lurks behind a thin drywall layer. A professional installer brings the right tools, the experience to adapt on the spot, and the accountability to stand behind the result.
RenoHeal’s team has completed 3,500+ projects across Toronto and the GTA, and we carry $5M in liability insurance plus WSIB coverage on every job. Request a free quote today and find out how quickly we can transform your closet — or explore everything we offer through our Handyman Services page.
Frequently Asked Questions
How long does closet shelving installation take in a Toronto condo?
A standard single-rod-and-shelf closet upgrade typically takes 2–3 hours. A full reach-in closet organizer system with multiple shelves, drawers, and rods usually runs 4–6 hours depending on wall condition and the number of components. Walk-in closet builds can take a full day or more.
What type of wall anchors should be used for closet shelving on drywall?
For shelving that will carry real weight, use toggle bolts (also called butterfly anchors) or Toggler SNAP-SKRUs rated for your load — standard plastic expansion anchors are not reliable for shelving. Whenever possible, drive screws directly into studs, which are typically spaced 16 inches apart in Toronto wood-frame homes and condos. If you’re working with a concrete or masonry wall, use sleeve anchors and a hammer drill.
How much weight can wire closet shelving hold with standard brackets?
Most wire shelving systems rated for residential use can handle 50–80 lbs per linear foot when properly anchored into studs or with quality toggle bolts. Overloading is almost always the result of too few brackets or anchors that pull out of drywall rather than a failure of the wire itself. Space brackets no more than 24 inches apart and always anchor the back rail into at least two studs for maximum stability.
Do I need permission from my condo board to install closet shelving?
In most Toronto condos, installing shelving inside a closet is considered a minor interior alteration and does not require board approval — but you should check your specific Declaration and Rules document to be sure. Some buildings require written notification or prohibit any drilling into certain wall types, particularly demising walls shared with neighbours. When in doubt, send a quick email to your property manager before the work starts.
How far apart should shelf brackets be spaced to prevent sagging?
For solid wood or melamine shelves that are ¾-inch thick, keep bracket spacing to 24 inches or less for light loads and no more than 16 inches for heavy items like books, shoes, or folded jeans. Wire shelving brackets follow the manufacturer’s spec, but 24 inches is a safe maximum. Going beyond these intervals causes noticeable sag over time, especially with particleboard-core shelves.
Is wire shelving or wood shelving better for a bedroom closet?
Wire shelving is cheaper (typically $3–$8 per linear foot for materials), installs faster, and allows airflow that helps prevent musty odours — a real advantage in Toronto’s humid summers. Wood or melamine shelving looks cleaner, holds folded clothes without fabric impressions, and feels more custom, but costs more and takes longer to install. For a rental unit or a utility closet, wire is practical; for a primary bedroom closet you use every day, wood-based shelving is usually worth the upgrade.
Closet Shelving Installation in Toronto: The Bottom Line
Getting closet shelving right comes down to three things: choosing the right system for how you actually use the space, anchoring it properly into studs or with the correct hardware for your wall type, and spacing brackets closely enough that shelves stay level under real-world loads. Cut corners on any one of those and you’ll be repatching drywall and starting over sooner than you’d like.
Material costs for a standard reach-in closet in Toronto typically run $150–$600 depending on the system, and professional installation adds $200–$500 for most jobs. That investment pays off quickly in a more organized, functional space — and it’s done once, done correctly.
RenoHeal’s technicians handle closet shelving installations across Toronto and the GTA every week, from simple wire shelf upgrades to full custom built-in systems. We bring the tools, the hardware knowledge, and the experience to get it right the first time. Request a free quote today, or visit our Handyman Services page to see everything we can take care of for you.