
Drilling into a concrete ceiling in Vaughan requires precision, the right tools, and knowledge of structural safety—especially in condominiums and commercial buildings where rebar and electrical lines hide inside the slab. What looks simple on the surface—hanging a light fixture or mounting a vent—can become expensive and dangerous if you hit reinforcing steel or puncture a wire. This is why homeowners and property managers across Vaughan, North York, and Toronto call in professionals rather than risk structural damage or personal injury.
A concrete ceiling drill job involves more than just power and pressure. You need to identify what’s embedded in that slab, use the correct bit speed and technique to avoid cracking, and know when to stop and call an engineer. We’ve completed thousands of projects across the GTA, and ceiling drilling shows up regularly—because it’s one of those tasks that looks amateur-friendly but demands experience.
This guide walks you through what drilling a concrete ceiling actually takes, real costs in Ontario, and why hiring an insured professional protects your property and your safety.
What ‘Drilling Into a Concrete Ceiling’ Actually Involves
Drilling a concrete ceiling isn’t just making a hole. You’re working against a material designed to be strong, and often that strength comes from steel rebar mesh or rod embedded inside the slab. If your drill bit hits rebar, the bit stops instantly—and your arm doesn’t. That’s why professionals use proper technique and positioning.
The scope includes locating utilities (electrical, plumbing, HVAC) before you drill, selecting the correct bit type and size, controlling drill speed to prevent concrete spalling, and stopping at the right depth to install your anchor or fixture. In condo buildings across Vaughan and Markham, you also need to verify structural drawings or get written permission from the property management office.
Tools and Materials
- Masonry/concrete drill bit — carbide-tipped or diamond-core for clean holes
- Hammer drill or rotary drill — impacts the concrete while rotating; rotary drills are for cleaner work
- Stud finder and pipe detector — locates rebar, wires, and plumbing before drilling
- Anchors or expansion bolts — rated for concrete load and fixture weight
- Dust collection system — concrete dust is silica-based and respiratory hazard without proper control
- Safety glasses and respirator — non-negotiable PPE
The Rebar Risk
Rebar—reinforcing steel bars—runs through concrete slabs to add tensile strength. If your hole path crosses rebar, your bit will bind, you risk losing control, and you’ve weakened the structure at that point. Professional crews use a detector to map rebar location before drilling and adjust hole placement accordingly. Hitting rebar also dulls or breaks your bit quickly, adding cost and delay.
In older Vaughan condos and commercial buildings, rebar patterns vary. Modern code requires at least 50 mm of concrete cover over rebar; drilling shallowly (<50 mm) is lower risk, but deeper fixtures (like ceiling mounts) require planning or a structural engineer's sign-off.
How We Drill Concrete Ceilings in Vaughan: A Real Project Breakdown
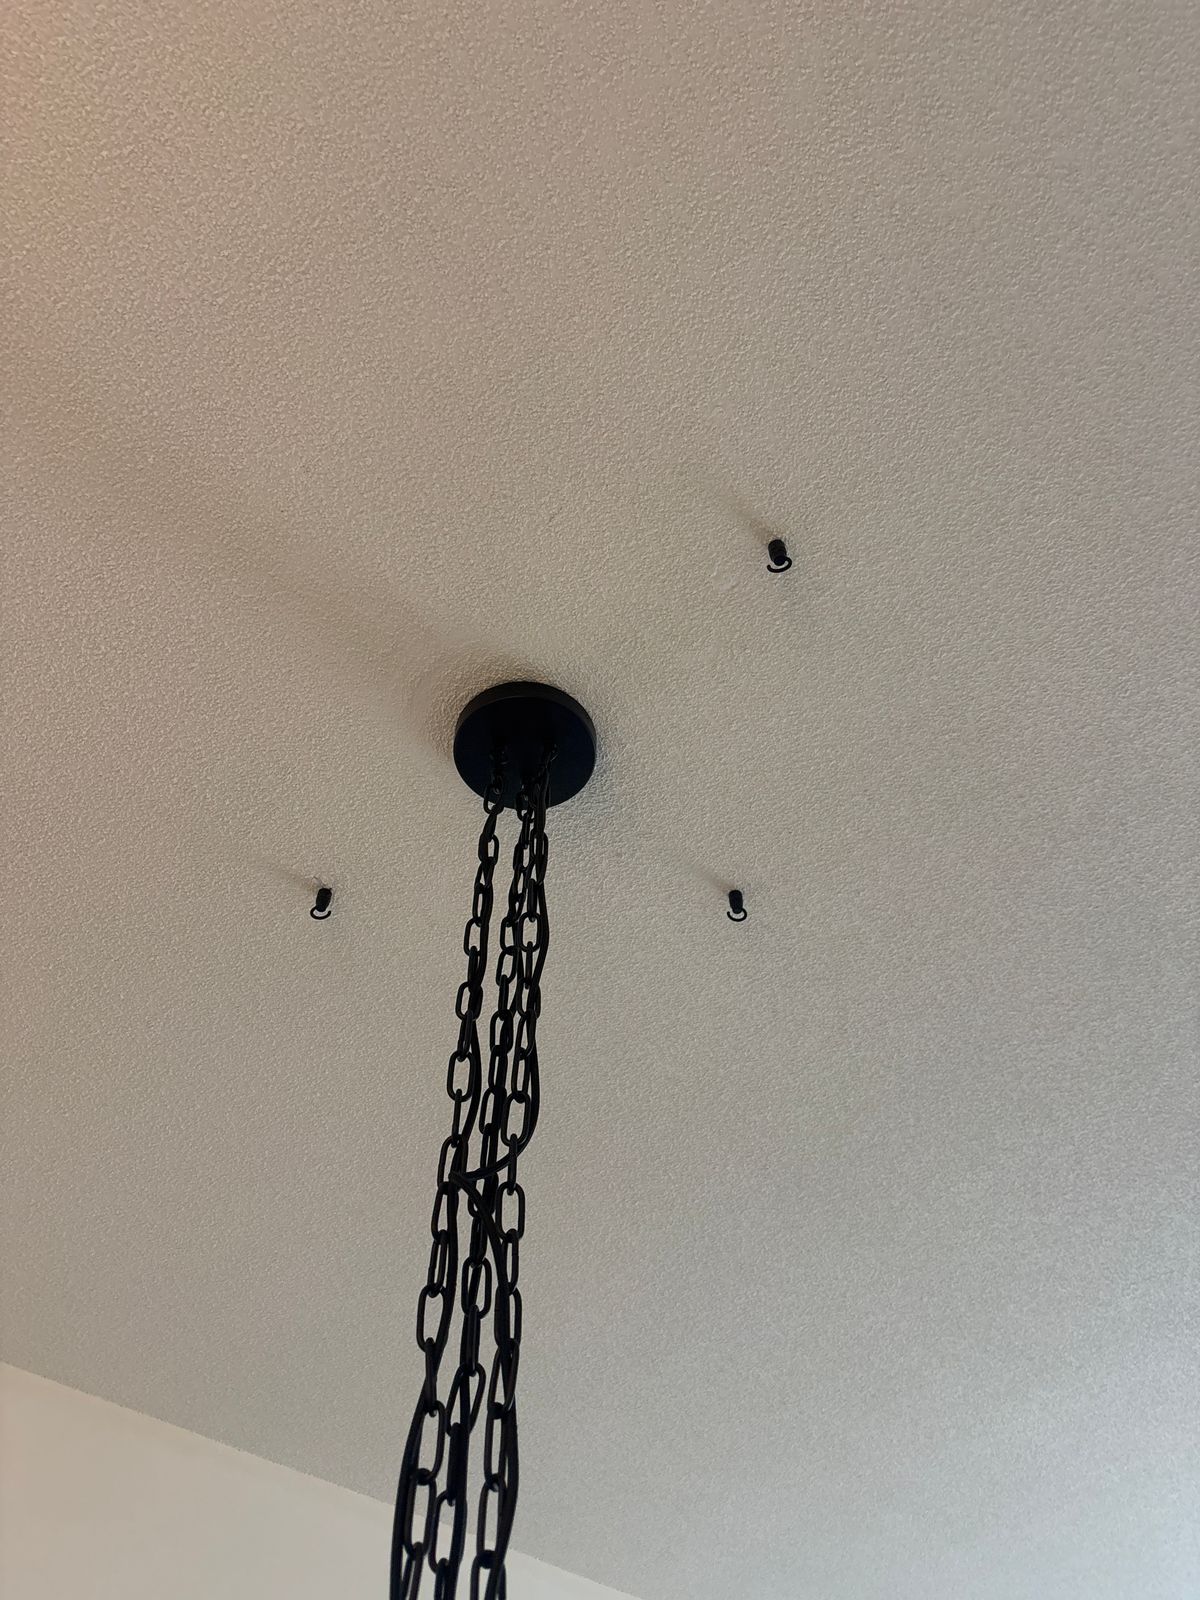
We recently completed a concrete ceiling drilling job in Unit 721, Vaughan—a condo building with a poured concrete slab ceiling. The request was straightforward: drill 3 holes to prepare for light fixture installation. No installation needed, just clean, precise holes. The property manager required access code 1364 and had confirmed permission for the work.
Step 1: Assessment and Safety Checks
We arrived with a metal detector (to locate rebar and electrical conduit) and building plans if available. The concrete was a standard 200 mm poured slab, typical for mid-rise condos. We scanned the three proposed hole locations and found clear zones away from rebar and the electrical conduit that ran parallel to the ceiling about 150 mm to the north. This information shaped our hole positions and drill depth.
Step 2: Marking and Setup
Using a marker, we marked the three hole centers. We verified the marks with the electrician’s notes (the light fixture was pre-wired and waiting in the unit). We set up dust containment—a small tent around each drilling area with a shop vac—because concrete dust spreads quickly in a furnished condo and tenants live below.
Step 3: Drilling the Holes
We used a rotary drill (not hammer) with a 10 mm carbide-tipped masonry bit. Hammer drilling would crack the ceiling slab from above; rotary drilling with moderate pressure cuts cleaner. Each hole took about 2–3 minutes. We drilled to 80 mm depth—enough to clear the rebar cover and seat the expansion anchors securely, but shallow enough to avoid hitting anything below.
Dust collection ran during the entire process. After each hole, we vacuumed the area and wiped the ceiling to keep the unit clean.
Step 4: Quality Check
We inspected each hole with a flashlight, checked depth with a measuring tape, and verified that the holes were square (perpendicular to the ceiling) so fixtures would hang level. All three holes passed. We left the site clean and provided the unit owner with a summary of hole depths and locations for the electrician’s reference.
Total Time and Cost
| Task | Time | Cost (CAD) |
|---|---|---|
| Site assessment and utility detection | 20 min | $40 |
| Drilling 3 holes (rotary, 80 mm depth) | 15 min | $90 |
| Dust containment and cleanup | 15 min | $30 |
| Total labour | 50 min | $160 |
Materials (bits, anchors, tape) added ~$25. The job invoiced at $185 before tax. Speed and precision matter: a mistake—hitting rebar or drilling too deep—would have cost the building thousands in structural repair or liability claims. That’s why professional handyman services exist for tasks like this across Toronto, North York, and the surrounding GTA.
If you’re facing a similar ceiling drilling need in Vaughan or nearby, get a free estimate from RenoHeal. We bring experience, proper tools, and insurance ($5M coverage) to protect your property.
How to Drill Concrete Ceiling Vaughan: Steps a Professional Follows
Drilling into a concrete ceiling isn’t a grab-the-drill-and-go job. Professionals follow a structured process that keeps you safe and the structure intact.
Step 1: Scan for Rebar and Utilities
Before any hole goes in, a rebar scanner checks the concrete for reinforcing steel and conduit. Hitting rebar weakens the structural integrity; hitting electrical conduit causes a serious hazard. A quality scan takes 10–15 minutes and is non-negotiable.
Step 2: Mark Your Holes with Precision
Using the marked points from your scan, technicians use a carbide-tipped center punch to create a small dimple. This prevents the drill bit from wandering when you start—critical on hard concrete surfaces. Mark all holes before drilling any of them.
Step 3: Use the Right Bit and Technique
A carbide or diamond-core drill bit cuts through concrete far better than standard steel bits. Professionals use a hammer drill or rotary hammer at medium speed with moderate pressure. Pushing too hard burns out the bit; going too fast generates excessive heat and dulls the edge. The drill should do the work, not your muscle.
Step 4: Install the Right Anchors
Once the hole is drilled (typically 3/8″ to 1/2″ diameter for light fixtures), the anchor type matters. Wedge anchors, sleeve anchors, and toggle bolts all work in concrete, but the fixture weight determines which one. For a light fixture, a 3/8″ wedge anchor rated for your load is standard.
On a recent handyman project in Vaughan, we drilled three holes into a cement ceiling for a light fixture. Scanning, marking, and using proper bits took about an hour—much faster than fixing a mistake.
Cost Guide: What It Costs to Drill Into a Concrete Ceiling in Vaughan
Concrete ceiling drilling costs depend on hole count, depth, location access, and whether anchors are installed. Here’s what you’ll typically pay in the Vaughan and GTA area:
| Service | Cost Range (CAD) | Notes |
|---|---|---|
| Rebar scan (per ceiling) | $75–$150 | Essential safety step; prevents damage and hazards |
| Drilling 1–3 holes (drilling only) | $150–$300 | Includes bit, labor, and cleanup; typical for light fixtures |
| Each additional hole | $40–$80 | Price decreases per hole when drilling multiple |
| Anchor installation (per hole) | $20–$50 | Wedge or toggle anchor; includes fasteners |
| Full service (scan + 3 holes + anchors) | $350–$550 | Most common package for light fixture installation |
What Affects the Price
- Ceiling height and access: Hard-to-reach areas or vaulted ceilings in Vaughan townhomes cost more because setup takes longer.
- Concrete thickness and age: Older concrete or reinforced slabs are harder to drill and wear bits faster.
- Hole size: Larger diameter holes (1″ and up) require different bits and take longer.
- Rebar density: Industrial ceilings or structures with heavy rebar may require repositioning holes, adding time.
- Material supply: Anchors and fasteners are included in most quotes, but specialty fasteners cost more.
If you’re drilling in Vaughan, North York, or Markham and need an accurate quote, request a free estimate. We scan first, price second—no surprises.
DIY vs. Hiring a Professional for Concrete Ceiling Drilling
Drilling into a concrete ceiling looks straightforward—drill a hole, install an anchor, mount your fixture. In reality, it requires the right equipment, technique, and safety planning that most homeowners don’t have.
Tools You’ll Actually Need
A regular cordless drill won’t cut it. You need a hammer drill or rotary drill with concrete bits (carbide-tipped or diamond), a stud finder that detects rebar and metal, a dust collection system or mask (concrete dust causes silicosis), and leveling tools. If you’re drilling more than a few holes—say, for recessed lighting or ceiling fans across a Toronto condo—you’re looking at $200–400 in tool rental alone.
The Real Risks
Hitting rebar or electrical wiring inside the concrete is the biggest hazard. A slip can cause electrical shock, structural damage, or water leaks if you damage embedded pipes. Concrete also produces fine silica dust that damages your lungs over time. Improper anchors can fail, sending your light fixture or TV mount crashing down—a serious safety risk in Scarborough, Vaughan, or any Ontario home with people below.
When DIY Fails
Most homeowners quit after the first hole cracks or their drill stops spinning. Concrete older than 20 years is often denser and reinforced differently, making manual drilling slow and frustrating. If you’re mounting anything heavy (a ceiling fan, projector, or large light array), you need load-rated anchors and proper depth—mistakes here void warranties and create liability.
Professional handyman services handle the scanning, drilling, and secure installation in one visit. RenoHeal brings industrial equipment and rebar detection to every job, turning a weekend frustration into a same-day finish.
Common Mistakes Homeowners Make When Drilling Concrete Ceilings
Even when homeowners commit to the task, specific mistakes waste time, damage ceilings, or worse—create safety hazards. Here are the ones we see most often in Vaughan, North York, and across the GTA.
1. Using the Wrong Drill Type
A standard cordless drill produces friction heat that can melt concrete-bit adhesive and burn out the motor. Concrete requires a hammer drill (impact + rotation), not just spin. Many homeowners waste an hour and a ruined bit before realizing the tool is wrong. Rotary drills are better but still require serious torque and patience.
2. Skipping Rebar and Wire Detection
Concrete ceilings in apartment buildings and modern homes often contain steel rebar for structural integrity and electrical conduit for wiring. Drilling blind without a metal detector puts you at risk of hitting live circuits (electrocution hazard) or damaging the ceiling’s structural reinforcement. A cheap stud finder doesn’t detect rebar reliably—you need a true metal scanner or call a pro who has one.
3. Installing Wrong Anchors or Sizes
Wedge anchors, drop-in anchors, and expansion bolts all work differently and support different loads. Using a plastic anchor in a ceiling (instead of a rated concrete anchor) leads to sagging or falling fixtures. Many homeowners also drill too shallow—concrete anchors need 1.5–2 inches of depth minimum, and shallow holes won’t grip properly.
4. Ignoring Dust and Ventilation
Concrete dust is silica, which causes permanent lung damage. Most DIY drillers work without masks or ventilation, breathing fine particles that settle in airways. Professional crews use HEPA vacuums or wet drilling to capture dust at the source.
For your next concrete ceiling project in Etobicoke, Markham, or anywhere in the GTA, request a free estimate and let a crew with the right tools and insurance handle the drilling safely.
Frequently Asked Questions
Can I use a regular drill to drill into a concrete ceiling?
A regular drill won’t cut it — concrete requires a hammer drill or rotary hammer with carbide-tipped masonry bits. Using a standard drill risks burning out the motor, snapping the bit, and leaving you with nothing more than a surface scratch. For overhead work in Vaughan homes and condos, a corded rotary hammer (SDS-Plus) is the minimum tool you should be working with.
How do I avoid hitting rebar when drilling into a cement ceiling?
Use a rebar scanner or ferroscan before you drill — these handheld detectors show you exactly where steel reinforcement runs so you can shift your anchor point by a few centimetres and stay clear. Cutting through rebar damages your bit, weakens the structural bar, and can trip breakers if the rebar is near electrical conduit. A professional technician will always scan first, especially in poured-concrete condo slabs common across Vaughan.
What size hole do I need for a ceiling light fixture anchor in concrete?
Most ceiling light fixtures use a 3/8″ or 1/2″ wedge anchor or sleeve anchor, which requires a matching diameter hole drilled to the anchor’s minimum embedment depth — typically 1.5″ to 2.5″ deep. Always check the anchor manufacturer’s spec sheet, because undersizing the hole even slightly prevents the anchor from seating properly and reduces its rated load capacity. For heavier fixtures like chandeliers or ceiling fans, a 1/2″ drop-in anchor with 2″+ embedment is the standard starting point.
How long does it take a professional to drill holes in a concrete ceiling?
A single clean anchor hole in a standard residential concrete ceiling takes a professional roughly 5–15 minutes once scanning is done and the location is marked. A typical job — say, four anchor points for a ceiling fan or light bar — is usually wrapped up in under an hour including cleanup. Thicker industrial slabs or harder aggregate can slow things down, but experienced technicians factor that in when scoping the job.
Is it safe to drill into a concrete ceiling in a condo or apartment building in Vaughan?
It can be, but condo drilling carries real risks that don’t exist in a detached home — embedded conduit, post-tension cables, and structural rebar are all common in Vaughan’s mid- and high-rise buildings. Most condo corporations require written approval before any ceiling penetration, and hitting a post-tension cable is a serious structural and safety event. Always get strata approval, use a professional with proper scanning equipment, and verify there are no building-specific restrictions before any work begins.
How much does it cost to drill into a concrete ceiling in Vaughan, Ontario?
In Vaughan, expect to pay roughly $150–$350 for a professional concrete ceiling drilling job that covers a small number of anchor points (e.g., one to four holes for a light fixture or ceiling fan). Pricing depends on the number of holes, slab thickness, whether rebar scanning is included, and travel time. Larger projects — like mounting a projector rail or installing multiple anchors across a basement ceiling — typically run $300–$600+, and a free on-site estimate is the most reliable way to get an accurate number.
Drill Concrete Ceiling Vaughan: The Smart Way to Get It Done Right
Drilling into a concrete ceiling is one of those jobs that looks straightforward until you’re holding a burnt-out drill bit overhead with dust in your eyes and a hole that’s off-centre. The combination of heavy overhead work, rebar risk, and the strict requirements in Vaughan condos and new builds makes this a project where the cost of doing it wrong consistently exceeds the cost of hiring a pro from the start.
The key takeaways: always use a hammer drill with masonry bits, scan for rebar and conduit before you drill, match your anchor diameter to the fixture load, and get condo board approval in writing if you’re in a multi-unit building. These aren’t optional steps — they’re what separates a secure, code-compliant anchor from a liability.
If you’d rather skip the prep work and get it done correctly the first time, request a free quote from RenoHeal today. Our experienced technicians handle concrete ceiling drilling across Vaughan and the GTA as part of our broader handyman services — fully insured, WSIB-covered, and backed by a 4.9-star track record on 3,500+ completed projects.