
A leaking sink or visible water damage under the vanity is one of the most common reasons homeowners book sink reinstallation Toronto service with RenoHeal. Sometimes the fix isn’t just recaulking—the entire sink needs to come out, the old silicone stripped away, and everything reassembled properly. This guide walks through exactly when that’s necessary, what the process costs, and what to expect when our technicians handle it.
Sink reinstallation isn’t complicated, but it does require attention to detail. Removing old sealant, cleaning the mounting surface, repositioning the basin correctly, and resealing it are straightforward steps when done right—and the difference between a temporary patch and a permanently watertight install.
When Does a Sink Actually Need to Be Fully Removed?
Not every leak means removal. If water is just seeping from the rim caulk, sometimes re-caulking alone solves it. But full removal is necessary when silicone has failed completely, the sink has shifted, or water has compromised the countertop substrate underneath.
Signs your sink needs to come out completely:
- Persistent water pooling or damage under the sink despite caulking attempts
- Visible deterioration of the countertop material around the sink perimeter
- Silicone that’s cracked, peeling, or turning black (mold growth)
- The sink lip sitting uneven or proud of the countertop surface
- Water entering the cabinet below during normal use or heavy rinsing
In our Toronto projects, we’ve seen homeowners wait too long before calling—water seeping down into vanity bases or even into condo infrastructure below. On a recent Toronto condo job, we had to pull the sink, strip the old silicone, clean the substrate, and reinstall it properly—after getting approval from building management first.
How Sink Reinstallation Works: The Real Process Step by Step
The process is logical and methodical. Proper removal and reinstallation takes 2–4 hours depending on sink type and how stubborn old sealant is.
1. Shut Off Water & Disconnect Plumbing
Turn off the water supply valves under the sink. Disconnect the hot and cold supply lines (have a bucket ready—there’s always a bit of water inside). Loosen the P-trap and remove it so you have clear access to the sink bowl from below.
2. Remove Old Silicone Completely
This is the longest step and where most homeowners cut corners. Using a utility knife, silicone removal tool, or even a heat gun, strip away every trace of old caulk from the sink rim and the countertop edge. Old silicone bonds new silicone weakly, so incomplete removal is why reinstalls fail again in 6 months. We use a combination of tools to get down to bare material on both the porcelain or stainless rim and the countertop surface.
3. Clean & Dry the Surface
Wipe the rim and countertop edge with a damp cloth, then dry thoroughly. Silicone doesn’t stick to damp surfaces. If moisture is trapped, it’ll fail faster. Any residue or dust should be gone before resealing.
4. Reposition the Sink Level
Place the sink back into the opening. Check that it sits flush and level using a spirit level. The rim should be even with the countertop surface all the way around—no rocking. If it doesn’t sit right, the countertop edge may be uneven or the sink itself warped. Shim as needed with stainless steel or plastic shims underneath.
5. Apply Silicone & Create a Waterproof Seal
Run a continuous bead of high-quality silicone around the entire sink perimeter, underneath the rim where it meets the countertop. Use a wet finger or silicone tool to smooth and press it into the seam. The goal is a consistent, smooth fillet that stops water from getting between the sink and counter. We use silicone rated for kitchen/bathroom (usually 100% silicone or silicone-acrylic blend)—not cheap caulk that shrinks and cracks.
6. Reconnect Water & Drain Lines
Once silicone has cured (typically 24 hours, but check the product label), reattach the P-trap, supply lines, and shutoff valves. Turn water back on, check for leaks under the sink, and run the drain to confirm everything drains.
In Scarborough, Etobicoke, and across the GTA, the steps are identical—the difference is in the patience taken and the quality of materials used. We back eligible kitchen and bathroom reinstalls with our workmanship warranty because we take the time to do it right the first time.
| Step | Time | Key Point |
|---|---|---|
| Disconnect plumbing | 15–20 min | Have a bucket ready |
| Remove old silicone | 30–60 min | Get it all off—this is critical |
| Clean & dry | 10–15 min | No moisture before resealing |
| Level & reposition | 10–15 min | Use a spirit level |
| Apply silicone | 15–20 min | Smooth, continuous bead |
| Cure time (wait) | 24 hours | Don’t use sink yet |
| Reconnect & test | 15–20 min | Check for leaks |
If you’re dealing with a leaky or shifting sink in North York, Markham, or Toronto, get a free estimate from our team. We’ll assess whether re-caulking is enough or if the sink needs full removal and reinstallation. Our technicians have completed 3,500+ kitchen, bathroom and home repair projects and know the difference between a quick fix and a permanent one.
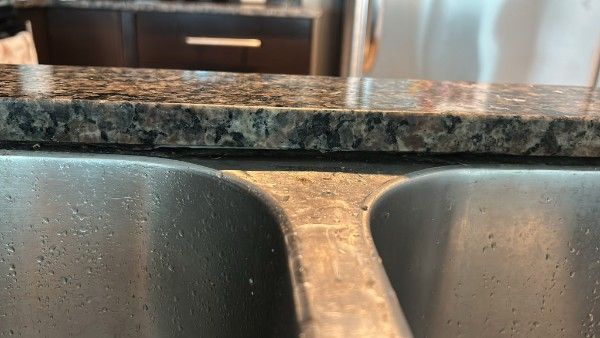
What Our Toronto Team Found on a Recent Job
We recently completed a sink reinstallation in downtown Toronto where the homeowner needed to access plumbing underneath. The catch: the building required concierge approval before we could access the P2 level. It’s a common detail people miss in condo buildings across Toronto, North York, and Scarborough—always ask before assuming you can access those areas.
The job itself involved removing old silicone sealant around the sink perimeter, carefully disconnecting the P-trap and supply lines, and then reinstalling the sink with fresh silicone and proper sealing. The previous sealant had degraded, which was letting water seep behind the counter and causing soft spots in the substrate. Once we removed the sink, we could see exactly what was happening underneath.
Total time on-site was about 4 hours from disconnect to final testing. The homeowner was back to using their sink the same day. If you’re dealing with water damage, slow drainage, or just need your sink out for counter or plumbing work, this is a straightforward job—but it does require attention to permits and proper technique during removal. Kitchen work like this is where having an experienced team makes the difference.
Sink Reinstallation Toronto: What It Costs in 2026
Sink reinstallation pricing in the GTA depends on sink type, complexity of plumbing access, and whether you need additional work like countertop repair or silicone sealing. Here’s what you’re looking at in 2026:
| Sink Type & Job Scope | Labour Cost (CAD) | Typical Timeline |
|---|---|---|
| Drop-in sink reinstall (basic) | $180–$300 | 2–3 hours |
| Undermount sink reinstall | $270–$400 | 3–4 hours |
| Sink + P-trap repair/replacement | $300–$500 | 3–5 hours |
| Sink + countertop caulking/sealing | $350–$550 | 4–6 hours |
| Condo with permit delays | Varies by building rules | +1–2 days scheduling |
What Affects Your Final Quote
- Sink removal difficulty. If old silicone is hardened or the sink is glued down, removal takes longer. Undermount sinks in Mississauga, Brampton, and Toronto often have tougher adhesive jobs.
- Supply line condition. Corroded or kinked lines may need replacement (see our plumbing repairs service); a new supply line kit runs $20–$40, but labour to swap it is included above.
- Countertop damage. If the countertop substrate is soft or damaged when you lift the sink, you’ll need repair or patching (additional $100–$300), and badly damaged tops may call for countertop replacement.
- Condo access. Buildings in Toronto and North York often require permits or scheduled maintenance windows, which can add delay fees or after-hours charges.
- Silicone and sealant quality. We use premium silicone (such as DAP or GE 100% silicone) to prevent future water damage; basic silicone costs less but fails faster in Ontario’s humid climate.
Most homeowners in the GTA spend $200–$450 for a straightforward sink reinstallation with proper sealing and testing. Get a free estimate if you’re in Toronto, Scarborough, Vaughan, or surrounding areas—we’ll confirm costs after a quick site look.
DIY vs. Hiring a Professional for Sink Reinstallation
Removing and reinstalling a sink sounds straightforward on YouTube—pull it out, reseal it, push it back—but the reality is messier. The biggest problem is silicone removal. Old caulk clings to the underside of the rim and the countertop, and scraping it away damages both surfaces if you’re not careful. Once you’ve torn up the countertop or rim, you’re looking at replacement costs that dwarf the price of hiring a pro from the start.
Water damage is the silent killer. If your drain connection isn’t perfectly aligned during reinstallation, water pools under the sink and soaks into cabinet wood and subfloor. In a Toronto condo like the one we handled, you also need building management approval before starting—most condo corporations require it, and the owner is usually liable if something goes wrong.
A professional handyman service removes silicone cleanly, handles drain alignment, tests for leaks, and knows local condo rules. You avoid callbacks and water damage claims. Most reinstallations in the GTA run $200–$450; water damage repair starts at $2,000.
Common Mistakes Homeowners Make During Sink Reinstallation
Skipping silicone prep is mistake number one. You can’t just wipe the old surface and slap new caulk on top. Leftover silicone residue, dust, and soap scum prevent the new bead from bonding. The caulk peels away within weeks, and water seeps into the gap. Use a putty knife and isopropyl alcohol to strip the rim and countertop completely.
Improper drain alignment causes slow leaks. When you reinstall the sink, the drain tail under the basin has to thread perfectly into the P-trap below. If it’s off by a quarter-inch, water drips into the cabinet every time you run the sink. You won’t see it for months, but mold and rot are already growing.
Over-tightening mounting bolts cracks ceramic. Porcelain and vitreous china are brittle. Cranking bolts too hard splits the underside of the rim. The split widens when the sink fills with water, and you end up replacing the entire fixture.
Forgetting condo approval is a liability. In Vaughan, North York, and downtown Toronto, condo docs require notice before water fixture work. Skip it and you could be held responsible for water damage to the units below. Get a free estimate from a licensed tech who knows these rules.
Frequently Asked Questions
How long does sink reinstallation take in Toronto?
Most sink reinstallations take between 1.5 and 3 hours, depending on the sink type and condition of the existing connections. A straightforward drop-in sink swap can be done in under 2 hours, while an undermount reinstallation with new silicone curing time may require a follow-up visit or same-day waiting period. Older plumbing or corroded shutoff valves can add time.
Do I need a permit to reinstall a sink in a Toronto condo?
In most cases, reinstalling the same sink in the same location does not require a permit in Toronto or Ontario — it’s considered maintenance, not a new installation. However, some condo corporations have their own rules about plumbing work and may require you to notify building management or use a licensed plumber. Always check with your property manager before starting any plumbing work in a condo unit, and review the City of Toronto building and construction guidance if the project grows beyond a like-for-like swap.
How much does sink reinstallation cost in Toronto?
Sink reinstallation in Toronto typically ranges from $150 to $400 CAD for labour, depending on the sink type, condition of the existing plumbing, and any parts that need replacing. Undermount sinks tend to cost more due to the silicone work and support requirements, while drop-in sinks are faster and less involved. If shutoff valves or supply lines also need replacing, budget an additional $50–$150 for parts.
Can I reuse the old silicone when reinstalling a sink?
No — old silicone should always be fully removed and replaced during a sink reinstallation. Applying new silicone over old creates a weak bond that won’t seal properly, which leads to water infiltrating the countertop or cabinet below. Proper prep means scraping off all old caulk, cleaning the surface with isopropyl alcohol, and applying a fresh bead of 100% silicone rated for kitchen or bathroom use.
What’s the difference between resealing a sink and fully reinstalling it?
Resealing a sink means removing and replacing only the silicone or caulk around the sink rim — the sink itself stays in place and the plumbing isn’t disconnected. A full reinstallation involves disconnecting the supply lines and drain, lifting the sink out completely, addressing whatever caused the problem (damaged clips, rotted countertop, failed caulk underneath), and then resetting and reconnecting everything. If the issue is just a cracked caulk line, resealing may be enough — but if water has already gotten underneath or the sink is shifting, reinstallation is the right fix.
Will my water need to be shut off during a sink reinstallation?
Yes — the water supply to the sink must be shut off before disconnecting any supply lines. In most homes, this is done at the local shutoff valves under the sink, so only that fixture is affected. If those valves are corroded or non-functional, the main water supply to the unit may need to be shut off temporarily, which is worth knowing in advance.
Sink Reinstallation Toronto: Costs, Process and When to Call a Pro
A sink that’s shifted, leaking at the rim, or coming away from the countertop isn’t a cosmetic issue — it’s a water damage problem waiting to happen. Whether you’re dealing with a failed undermount seal, corroded mounting clips, or a full replacement scenario, getting the reinstallation done right means proper prep, fresh silicone, and secure connections that will hold up to daily use.
Most Toronto homeowners can expect to pay $150–$400 CAD in labour, with the job completed within a few hours. The key is catching the problem early — before water works its way into the cabinet below and you’re dealing with swollen particleboard or mold.
RenoHeal handles sink reinstallation across Toronto and the GTA with same-day availability, fully insured technicians, and a 4.9-star track record on 3,500+ completed projects. Request a free quote today, or visit our bathroom services page to see everything we can take care of while we’re there.